Amazon Web Services (AWS) has become a leader in cloud computing. One of its core components is S3, the object storage service offered by AWS. With its impressive availability and durability, it has become the standard way to store videos, images, and data. You can combine S3 with other services to build infinitely scalable applications.
Boto3 is the name of the Python SDK for AWS. It allows you to directly create, update, and delete AWS resources from your Python scripts.
If you’ve had some AWS exposure before, have your own AWS account, and want to take your skills to the next level by starting to use AWS services from within your Python code, then keep reading.
By the end of this tutorial, you’ll
- Be confident working with buckets and objects directly from your Python scripts
- Know how to avoid common pitfalls when using Boto3 and S3
- Understand how to set up your data from the start to avoid performance issues later
- Learn how to configure your objects to take advantage of S3’s best features
Installation
To install Boto3 on your computer, go to your terminal and run the following:
$ pip install boto3
You’ve got the SDK. But, you won’t be able to use it right now, because it doesn’t know which AWS account it should connect to.
To make it run against your AWS account, you’ll need to provide some valid credentials. If you already have an IAM user that has full permissions to S3, you can use those user’s credentials (their access key and their secret access key) without needing to create a new user. Otherwise, the easiest way to do this is to create a new AWS user and then store the new credentials.
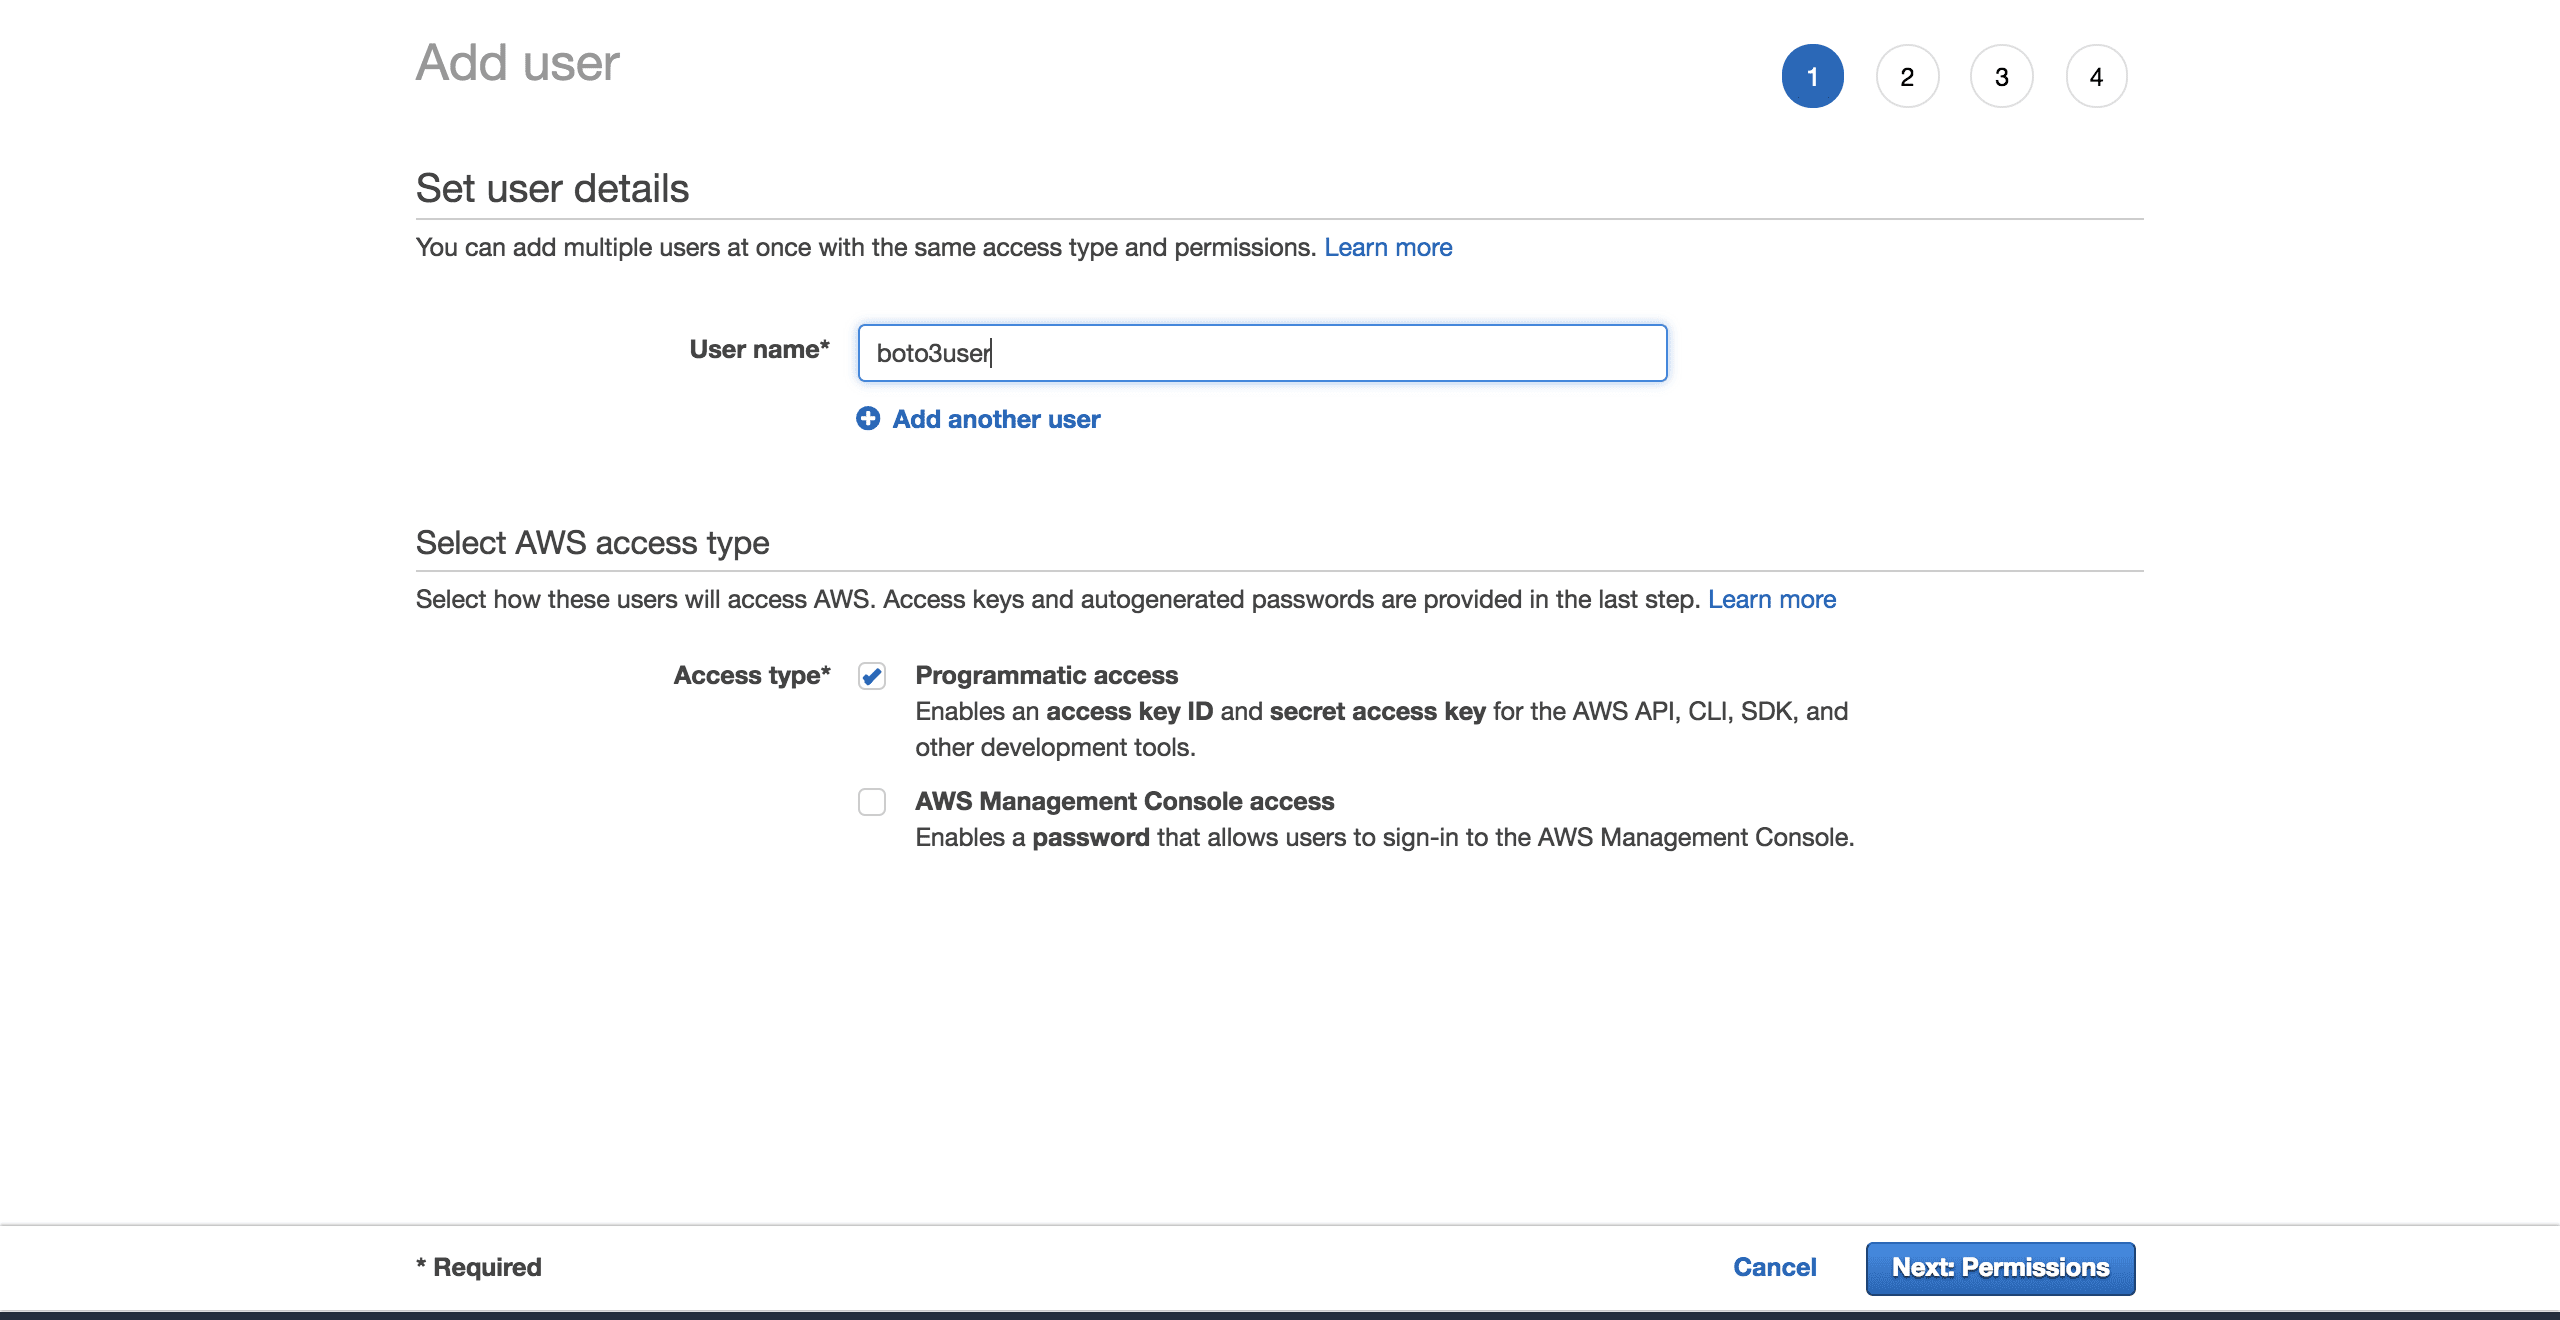
To create a new user, go to your AWS account, then go to Services and select IAM. Then choose Users and click on Add user.
Give the user a name (for example, boto3user). Enable programmatic access. This will ensure that this user will be able to work with any AWS supported SDK or make separate API calls:
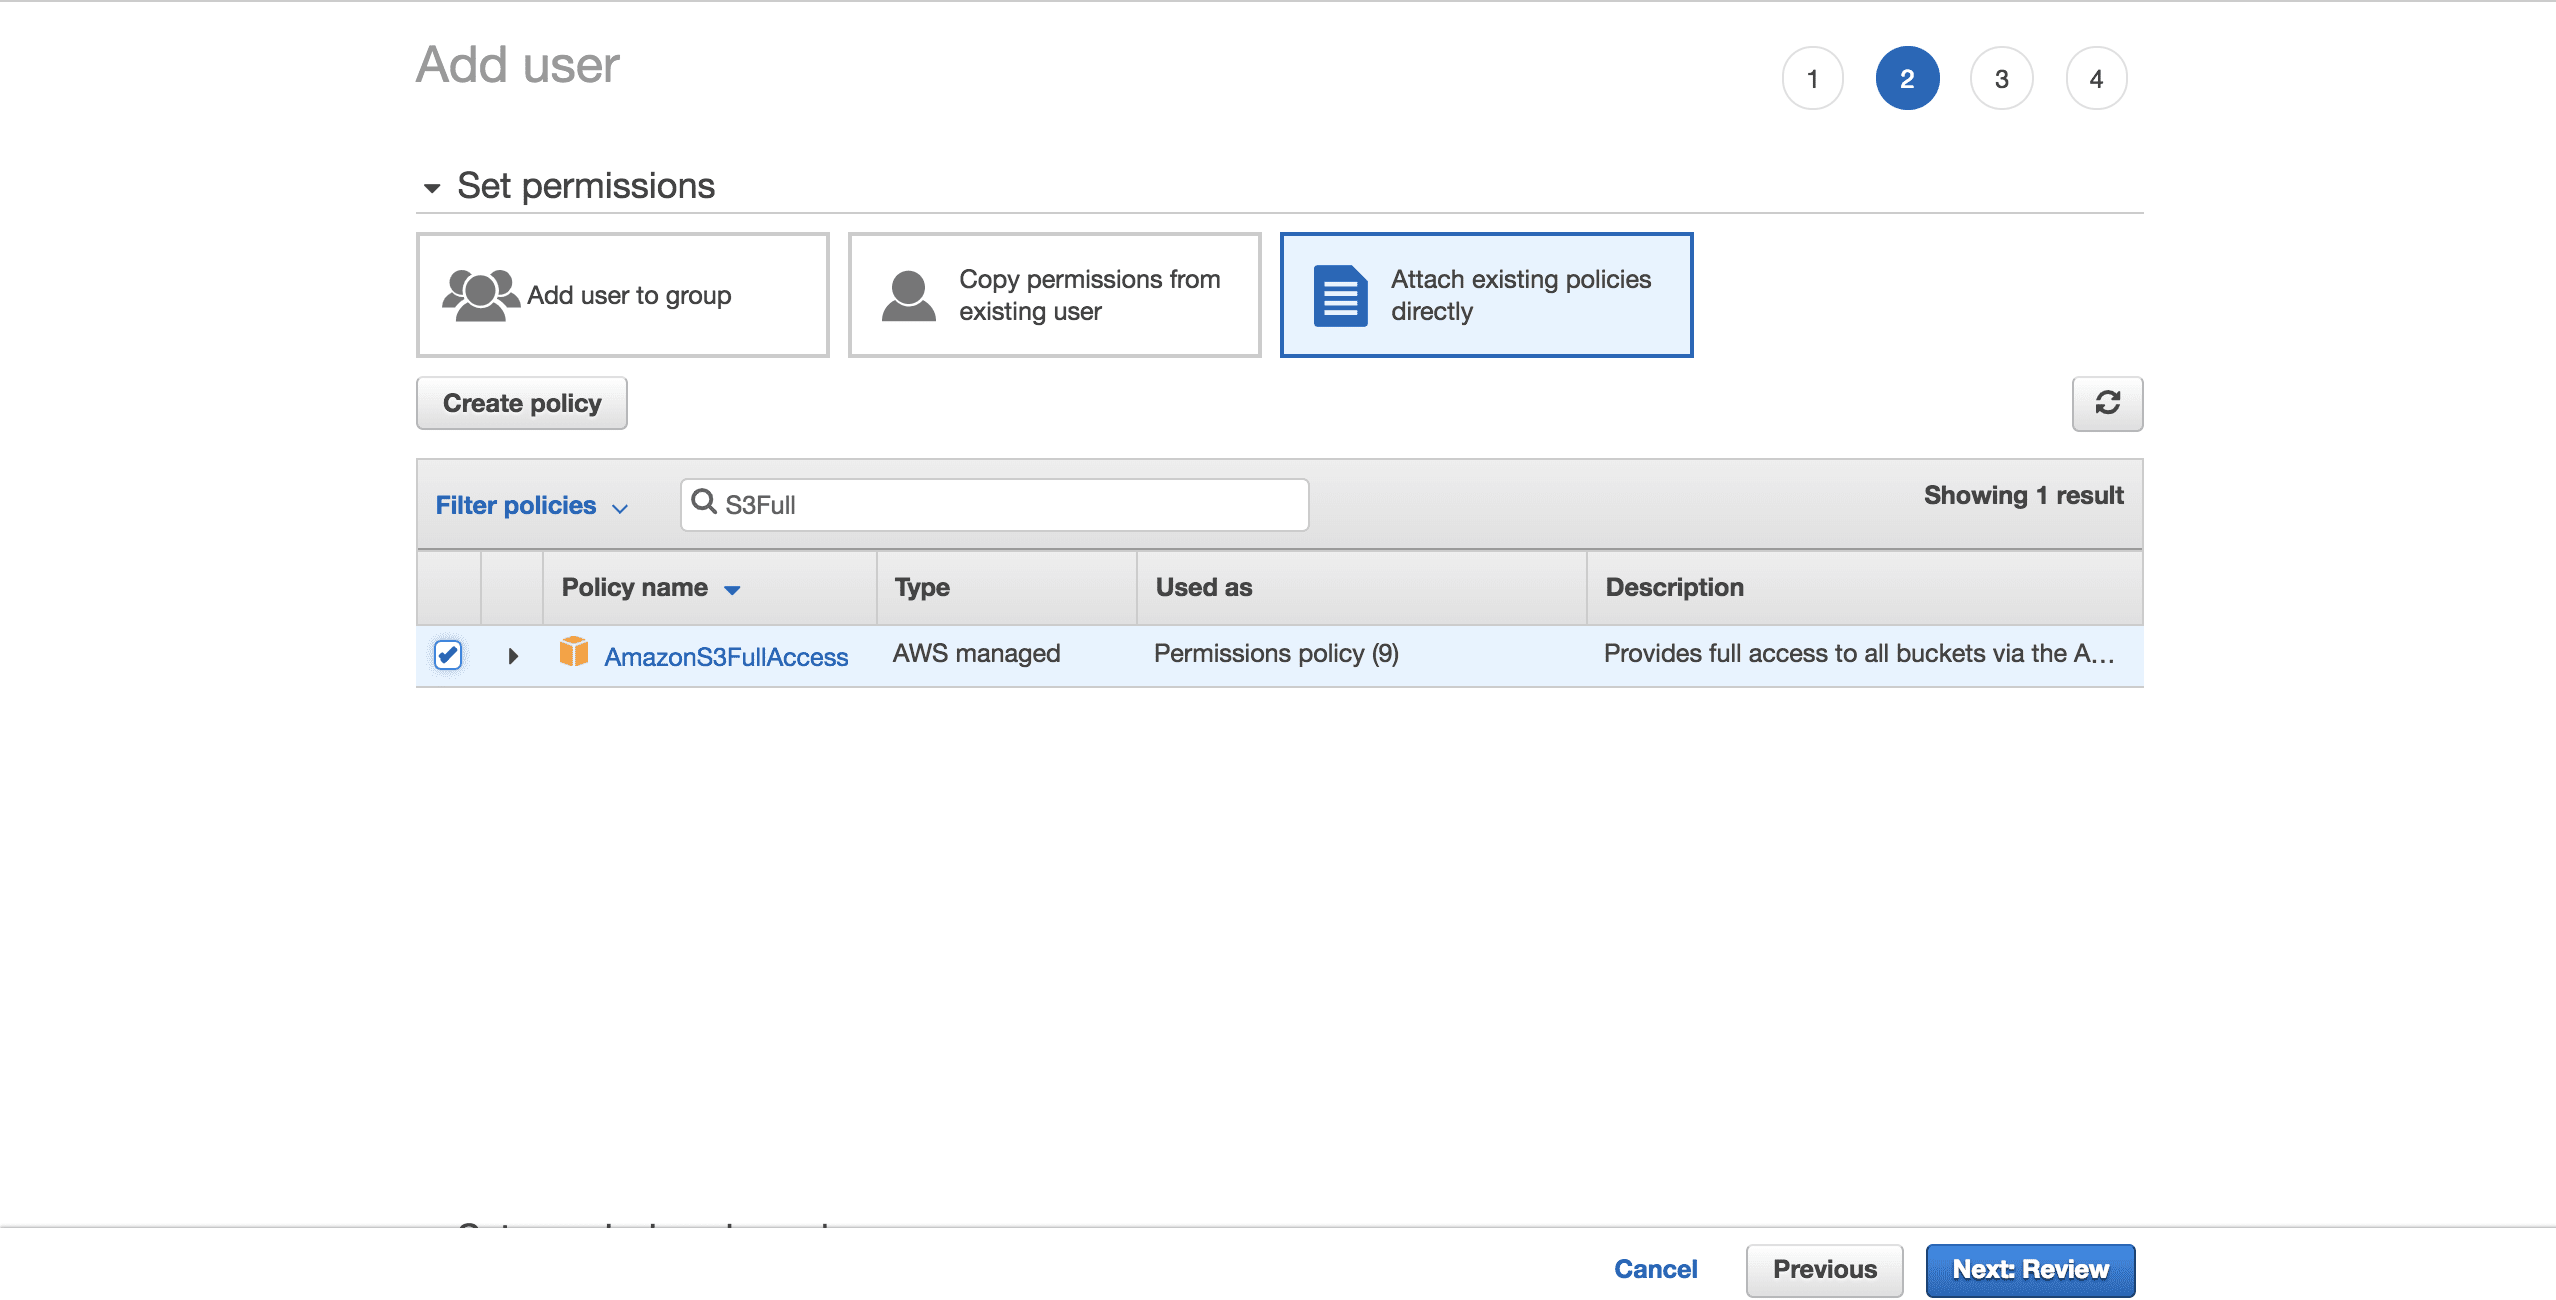
To keep things simple, choose the preconfigured AmazonS3FullAccess policy. With this policy, the new user will be able to have full control over S3. Click on Next: Review:
Select Create user:
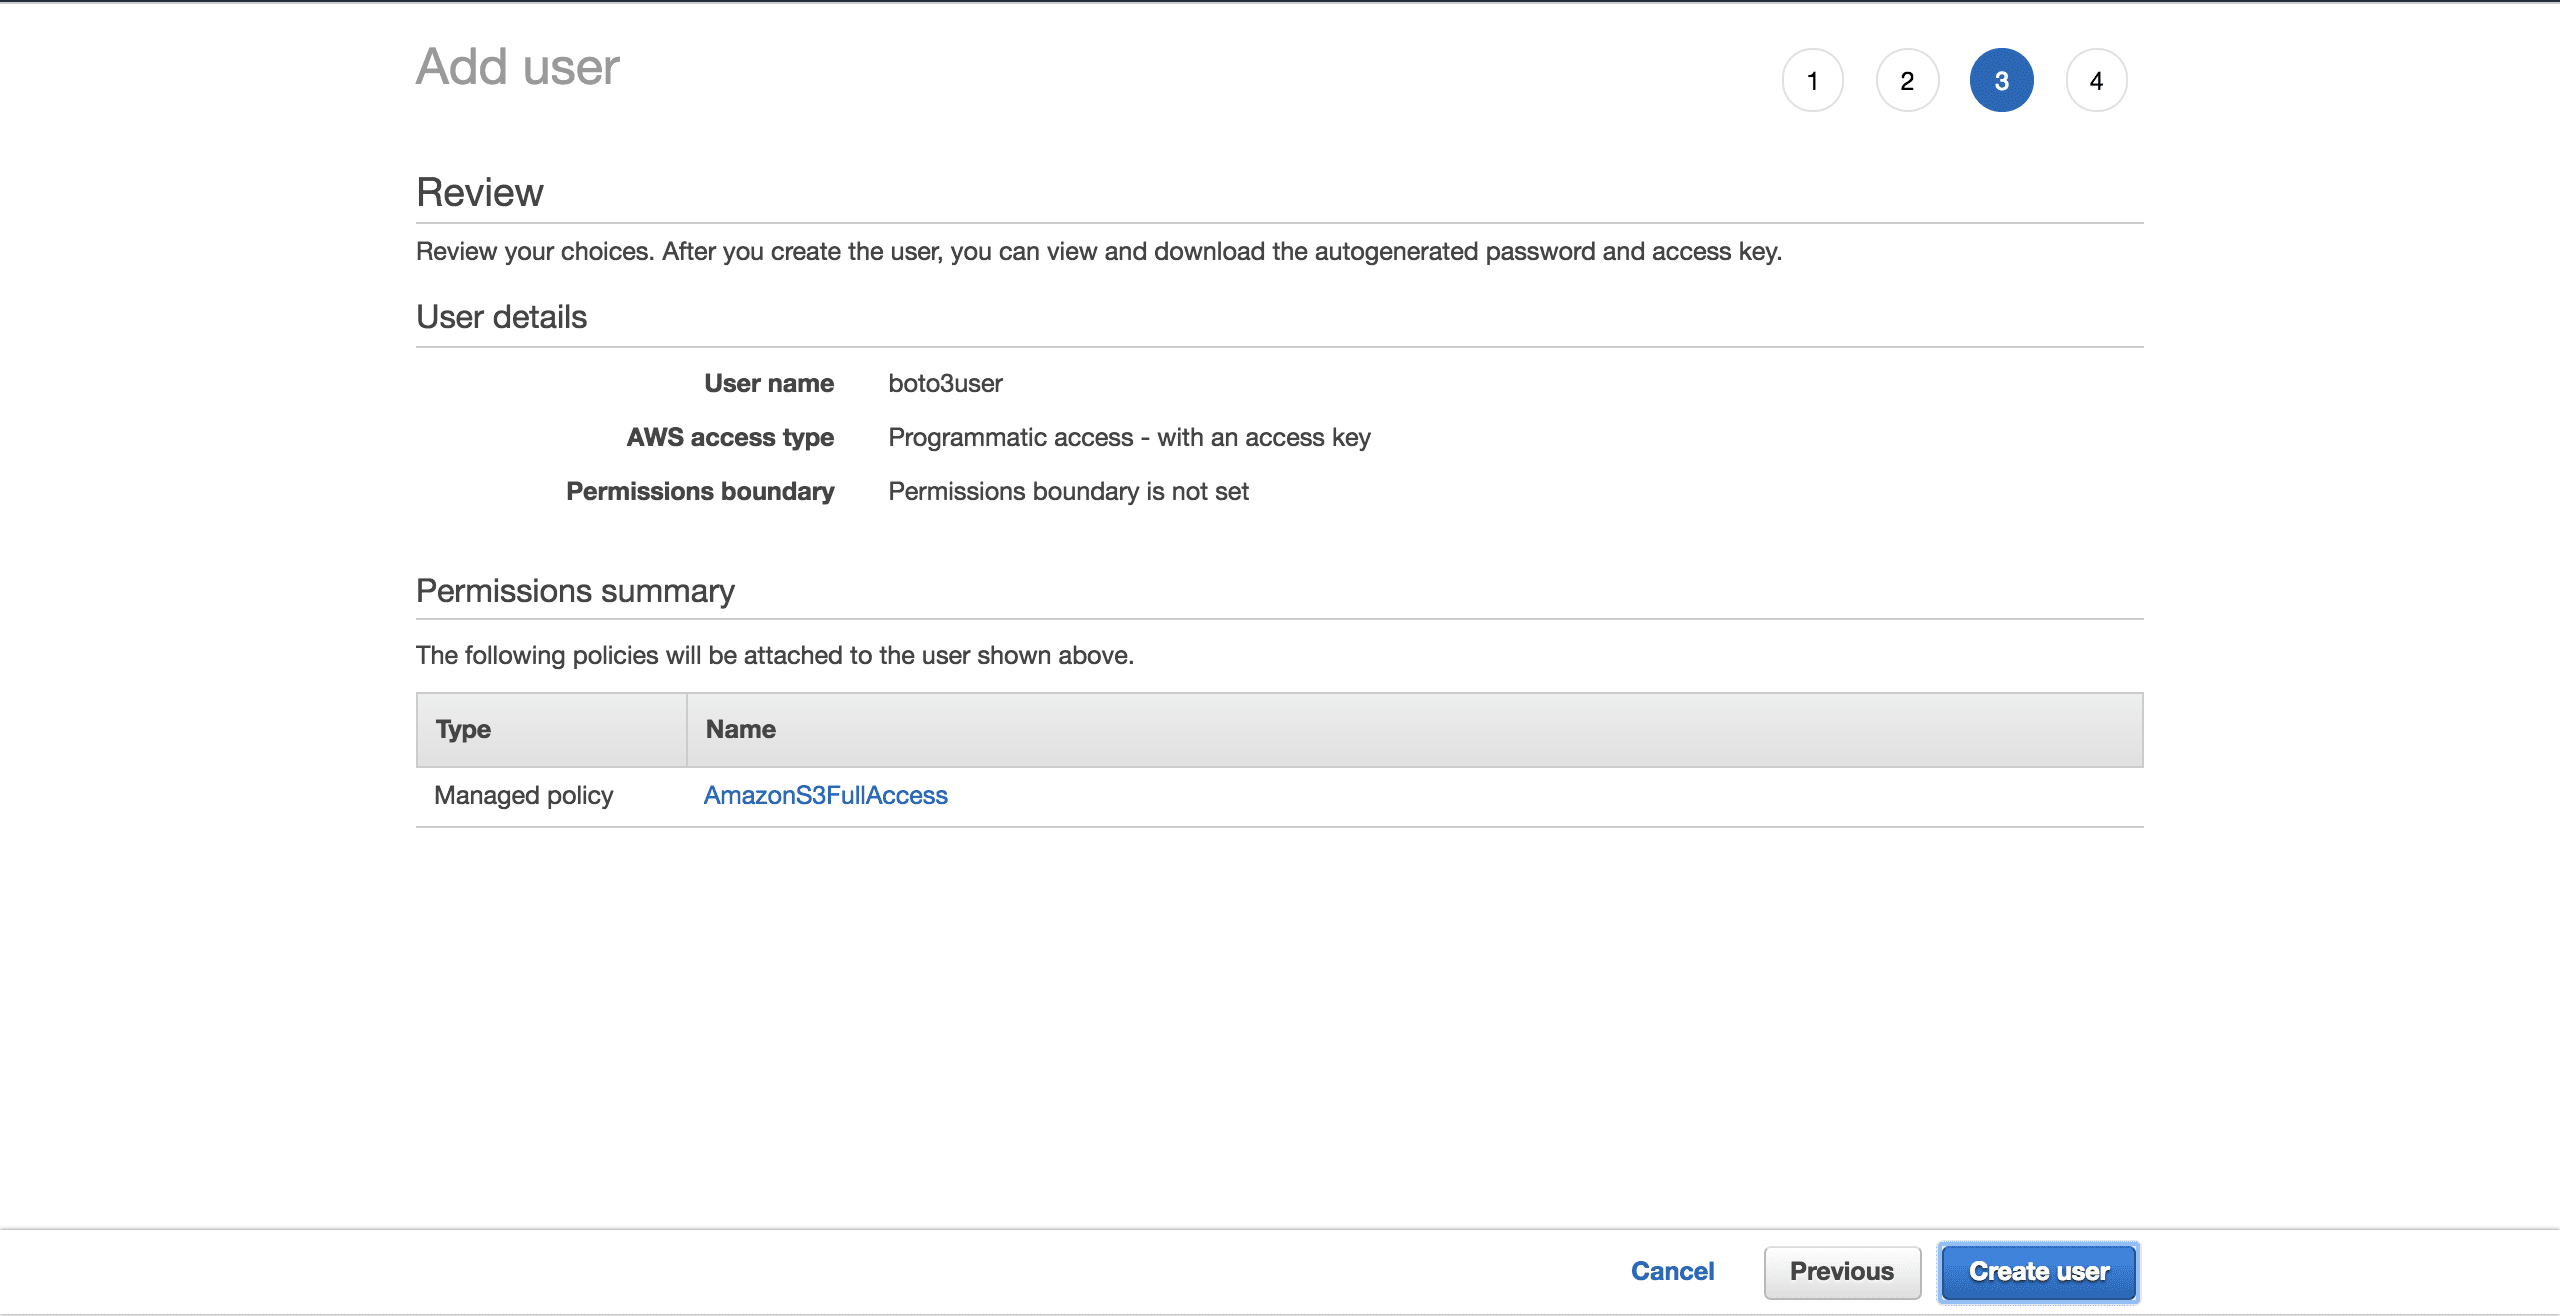
A new screen will show you the user’s generated credentials. Click on the Download .csv button to make a copy of the credentials. You will need them to complete your setup.
Now that you have your new user, create a new file, ~/.aws/credentials:
$ touch ~/.aws/credentials
Open the file and paste the structure below. Fill in the placeholders with the new user credentials you have downloaded:
[default]
aws_access_key_id = YOUR_ACCESS_KEY_ID
aws_secret_access_key = YOUR_SECRET_ACCESS_KEY
Save the file.
Now that you have set up these credentials, you have a default profile, which will be used by Boto3 to interact with your AWS account.
There is one more configuration to set up: the default region that Boto3 should interact with. You can check out the complete table of the supported AWS regions. Choose the region that is closest to you. Copy your preferred region from the Region column. In my case, I am using eu-west-1 (Ireland).
Create a new file, ~/.aws/config:
$ touch ~/.aws/config
Add the following and replace the placeholder with the region you have copied:
[default]
region = YOUR_PREFERRED_REGION
Save your file.
You are now officially set up for the rest of the tutorial.
Next, you will see the different options Boto3 gives you to connect to S3 and other AWS services.
Client Versus Resource
At its core, all that Boto3 does is call AWS APIs on your behalf. For the majority of the AWS services, Boto3 offers two distinct ways of accessing these abstracted APIs:
- Client: low-level service access
- Resource: higher-level object-oriented service access
You can use either to interact with S3.
To connect to the low-level client interface, you must use Boto3’s client(). You then pass in the name of the service you want to connect to, in this case, s3:
import boto3
s3_client = boto3.client('s3')
To connect to the high-level interface, you’ll follow a similar approach, but use resource():
import boto3
s3_resource = boto3.resource('s3')
You’ve successfully connected to both versions, but now you might be wondering, “Which one should I use?”
With clients, there is more programmatic work to be done. The majority of the client operations give you a dictionary response. To get the exact information that you need, you’ll have to parse that dictionary yourself. With resource methods, the SDK does that work for you.
With the client, you might see some slight performance improvements. The disadvantage is that your code becomes less readable than it would be if you were using the resource. Resources offer a better abstraction, and your code will be easier to comprehend.
Understanding how the client and the resource are generated is also important when you’re considering which one to choose:
- Boto3 generates the client from a JSON service definition file. The client’s methods support every single type of interaction with the target AWS service.
- Resources, on the other hand, are generated from JSON resource definition files.
Boto3 generates the client and the resource from different definitions. As a result, you may find cases in which an operation supported by the client isn’t offered by the resource. Here’s the interesting part: you don’t need to change your code to use the client everywhere. For that operation, you can access the client directly via the resource like so: s3_resource.meta.client.
client operation is .generate_presigned_url(), which enables you to give your users access to an object within your bucket for a set period of time, without requiring them to have AWS credentials.Common Operations
Now that you know about the differences between clients and resources, let’s start using them to build some new S3 components.
Creating a Bucket
To start off, you need an S3 bucket. To create one programmatically, you must first choose a name for your bucket. Remember that this name must be unique throughout the whole AWS platform, as bucket names are DNS compliant. If you try to create a bucket, but another user has already claimed your desired bucket name, your code will fail. Instead of success, you will see the following error: botocore.errorfactory.BucketAlreadyExists.
You can increase your chance of success when creating your bucket by picking a random name. You can generate your own function that does that for you. In this implementation, you’ll see how using the uuid module will help you achieve that. A UUID4’s string representation is 36 characters long (including hyphens), and you can add a prefix to specify what each bucket is for.
Here’s a way you can achieve that:
import uuid
def create_bucket_name(bucket_prefix):
    # The generated bucket name must be between 3 and 63 chars long
    return ''.join([bucket_prefix, str(uuid.uuid4())])
You’ve got your bucket name, but now there’s one more thing you need to be aware of: unless your region is in the United States, you’ll need to define the region explicitly when you are creating the bucket. Otherwise you will get an IllegalLocationConstraintException.
To exemplify what this means when you’re creating your S3 bucket in a non-US region, take a look at the code below:
s3_resource.create_bucket(Bucket=YOUR_BUCKET_NAME,
                          CreateBucketConfiguration={
                              'LocationConstraint': 'eu-west-1'})
You need to provide both a bucket name and a bucket configuration where you must specify the region, which in my case is eu-west-1.
This isn’t ideal. Imagine that you want to take your code and deploy it to the cloud. Your task will become increasingly more difficult because you’ve now hardcoded the region. You could refactor the region and transform it into an environment variable, but then you’d have one more thing to manage.
Luckily, there is a better way to get the region programatically, by taking advantage of a session object. Boto3 will create the session from your credentials. You just need to take the region and pass it to create_bucket() as its LocationConstraint configuration. Here’s how to do that:
def create_bucket(bucket_prefix, s3_connection):
    session = boto3.session.Session()
    current_region = session.region_name
    bucket_name = create_bucket_name(bucket_prefix)
    bucket_response = s3_connection.create_bucket(
        Bucket=bucket_name,
        CreateBucketConfiguration={
        'LocationConstraint': current_region})
    print(bucket_name, current_region)
    return bucket_name, bucket_response
The nice part is that this code works no matter where you want to deploy it: locally/EC2/Lambda. Moreover, you don’t need to hardcode your region.
As both the client and the resource create buckets in the same way, you can pass either one as the s3_connection parameter.
You’ll now create two buckets. First create one using the client, which gives you back the bucket_response as a dictionary:
>>> first_bucket_name, first_response = create_bucket(
...     bucket_prefix='firstpythonbucket',
...     s3_connection=s3_resource.meta.client)
firstpythonbucket7250e773-c4b1-422a-b51f-c45a52af9304 eu-west-1

>>> first_response
{'ResponseMetadata': {'RequestId': 'E1DCFE71EDE7C1EC', 'HostId': 'r3AP32NQk9dvbHSEPIbyYADT769VQEN/+xT2BPM6HCnuCb3Z/GhR2SBP+GM7IjcxbBN7SQ+k+9B=', 'HTTPStatusCode': 200, 'HTTPHeaders': {'x-amz-id-2': 'r3AP32NQk9dvbHSEPIbyYADT769VQEN/+xT2BPM6HCnuCb3Z/GhR2SBP+GM7IjcxbBN7SQ+k+9B=', 'x-amz-request-id': 'E1DCFE71EDE7C1EC', 'date': 'Fri, 05 Oct 2018 15:00:00 GMT', 'location': 'http://firstpythonbucket7250e773-c4b1-422a-b51f-c45a52af9304.s3.amazonaws.com/', 'content-length': '0', 'server': 'AmazonS3'}, 'RetryAttempts': 0}, 'Location': 'http://firstpythonbucket7250e773-c4b1-422a-b51f-c45a52af9304.s3.amazonaws.com/'}
Then create a second bucket using the resource, which gives you back a Bucket instance as the bucket_response:
>>> second_bucket_name, second_response = create_bucket(
...     bucket_prefix='secondpythonbucket', s3_connection=s3_resource)
secondpythonbucket2d5d99c5-ab96-4c30-b7f7-443a95f72644 eu-west-1

>>> second_response
s3.Bucket(name='secondpythonbucket2d5d99c5-ab96-4c30-b7f7-443a95f72644')
You’ve got your buckets. Next, you’ll want to start adding some files to them.
Naming Your Files
You can name your objects by using standard file naming conventions. You can use any valid name. In this article, you’ll look at a more specific case that helps you understand how S3 works under the hood.
If you’re planning on hosting a large number of files in your S3 bucket, there’s something you should keep in mind. If all your file names have a deterministic prefix that gets repeated for every file, such as a timestamp format like “YYYY-MM-DDThh:mm:ss”, then you will soon find that you’re running into performance issues when you’re trying to interact with your bucket.
This will happen because S3 takes the prefix of the file and maps it onto a partition. The more files you add, the more will be assigned to the same partition, and that partition will be very heavy and less responsive.
What can you do to keep that from happening?
The easiest solution is to randomize the file name. You can imagine many different implementations, but in this case, you’ll use the trusted uuid module to help with that. To make the file names easier to read for this tutorial, you’ll be taking the first six characters of the generated number’s hex representation and concatenate it with your base file name.
The helper function below allows you to pass in the number of bytes you want the file to have, the file name, and a sample content for the file to be repeated to make up the desired file size:
def create_temp_file(size, file_name, file_content):
    random_file_name = ''.join([str(uuid.uuid4().hex[:6]), file_name])
    with open(random_file_name, 'w') as f:
        f.write(str(file_content) * size)
    return random_file_name
Create your first file, which you’ll be using shortly:
first_file_name = create_temp_file(300, 'firstfile.txt', 'f')
By adding randomness to your file names, you can efficiently distribute your data within your S3 bucket.
Creating Bucket and Object Instances
The next step after creating your file is to see how to integrate it into your S3 workflow.
This is where the resource’s classes play an important role, as these abstractions make it easy to work with S3.
By using the resource, you have access to the high-level classes (Bucket and Object). This is how you can create one of each:
first_bucket = s3_resource.Bucket(name=first_bucket_name)
first_object = s3_resource.Object(
    bucket_name=first_bucket_name, key=first_file_name)
The reason you have not seen any errors with creating the first_object variable is that Boto3 doesn’t make calls to AWS to create the reference. The bucket_name and the key are called identifiers, and they are the necessary parameters to create an Object. Any other attribute of an Object, such as its size, is lazily loaded. This means that for Boto3 to get the requested attributes, it has to make calls to AWS.
Understanding Sub-resources
Bucket and Object are sub-resources of one another. Sub-resources are methods that create a new instance of a child resource. The parent’s identifiers get passed to the child resource.
If you have a Bucket variable, you can create an Object directly:
first_object_again = first_bucket.Object(first_file_name)
Or if you have an Object variable, then you can get the Bucket:
first_bucket_again = first_object.Bucket()
Great, you now understand how to generate a Bucket and an Object. Next, you’ll get to upload your newly generated file to S3 using these constructs.
Uploading a File
There are three ways you can upload a file:
- From an
Objectinstance - From a
Bucketinstance - From the
client
In each case, you have to provide the Filename, which is the path of the file you want to upload. You’ll now explore the three alternatives. Feel free to pick whichever you like most to upload the first_file_name to S3.
Object Instance Version
You can upload using an Object instance:
s3_resource.Object(first_bucket_name, first_file_name).upload_file(
    Filename=first_file_name)
Or you can use the first_object instance:
first_object.upload_file(first_file_name)
Bucket Instance Version
Here’s how you can upload using a Bucket instance:
s3_resource.Bucket(first_bucket_name).upload_file(
    Filename=first_file_name, Key=first_file_name)
Client Version
You can also upload using the client:
s3_resource.meta.client.upload_file(
    Filename=first_file_name, Bucket=first_bucket_name,
    Key=first_file_name)
You have successfully uploaded your file to S3 using one of the three available methods. In the upcoming sections, you’ll mainly work with the Object class, as the operations are very similar between the client and the Bucket versions.
Downloading a File
To download a file from S3 locally, you’ll follow similar steps as you did when uploading. But in this case, the Filename parameter will map to your desired local path. This time, it will download the file to the tmp directory:
s3_resource.Object(first_bucket_name, first_file_name).download_file(
    f'/tmp/{first_file_name}') # Python 3.6+
You’ve successfully downloaded your file from S3. Next, you’ll see how to copy the same file between your S3 buckets using a single API call.
Copying an Object Between Buckets
If you need to copy files from one bucket to another, Boto3 offers you that possibility. In this example, you’ll copy the file from the first bucket to the second, using .copy():
def copy_to_bucket(bucket_from_name, bucket_to_name, file_name):
    copy_source = {
        'Bucket': bucket_from_name,
        'Key': file_name
    }
    s3_resource.Object(bucket_to_name, file_name).copy(copy_source)

copy_to_bucket(first_bucket_name, second_bucket_name, first_file_name)
Deleting an Object
Let’s delete the new file from the second bucket by calling .delete() on the equivalent Object instance:
s3_resource.Object(second_bucket_name, first_file_name).delete()
You’ve now seen how to use S3’s core operations. You’re ready to take your knowledge to the next level with more complex characteristics in the upcoming sections.
Advanced Configurations
In this section, you’re going to explore more elaborate S3 features. You’ll see examples of how to use them and the benefits they can bring to your applications.
ACL (Access Control Lists)
Access Control Lists (ACLs) help you manage access to your buckets and the objects within them. They are considered the legacy way of administrating permissions to S3. Why should you know about them? If you have to manage access to individual objects, then you would use an Object ACL.
By default, when you upload an object to S3, that object is private. If you want to make this object available to someone else, you can set the object’s ACL to be public at creation time. Here’s how you upload a new file to the bucket and make it accessible to everyone:
second_file_name = create_temp_file(400, 'secondfile.txt', 's')
second_object = s3_resource.Object(first_bucket.name, second_file_name)
second_object.upload_file(second_file_name, ExtraArgs={
                          'ACL': 'public-read'})
You can get the ObjectAcl instance from the Object, as it is one of its sub-resource classes:
second_object_acl = second_object.Acl()
To see who has access to your object, use the grants attribute:
>>> second_object_acl.grants
[{'Grantee': {'DisplayName': 'name', 'ID': '24aafdc2053d49629733ff0141fc9fede3bf77c7669e4fa2a4a861dd5678f4b5', 'Type': 'CanonicalUser'}, 'Permission': 'FULL_CONTROL'}, {'Grantee': {'Type': 'Group', 'URI': 'http://acs.amazonaws.com/groups/global/AllUsers'}, 'Permission': 'READ'}]
You can make your object private again, without needing to re-upload it:
>>> response = second_object_acl.put(ACL='private')
>>> second_object_acl.grants
[{'Grantee': {'DisplayName': 'name', 'ID': '24aafdc2053d49629733ff0141fc9fede3bf77c7669e4fa2a4a861dd5678f4b5', 'Type': 'CanonicalUser'}, 'Permission': 'FULL_CONTROL'}]
You have seen how you can use ACLs to manage access to individual objects. Next, you’ll see how you can add an extra layer of security to your objects by using encryption.
Note: If you’re looking to split your data into multiple categories, have a look at tags. You can grant access to the objects based on their tags.
Encryption
With S3, you can protect your data using encryption. You’ll explore server-side encryption using the AES-256 algorithm where AWS manages both the encryption and the keys.
Create a new file and upload it using ServerSideEncryption:
third_file_name = create_temp_file(300, 'thirdfile.txt', 't')
third_object = s3_resource.Object(first_bucket_name, third_file_name)
third_object.upload_file(third_file_name, ExtraArgs={
                         'ServerSideEncryption': 'AES256'})
You can check the algorithm that was used to encrypt the file, in this case AES256:
>>> third_object.server_side_encryption
'AES256'
You now understand how to add an extra layer of protection to your objects using the AES-256 server-side encryption algorithm offered by AWS.
Storage
Every object that you add to your S3 bucket is associated with a storage class. All the available storage classes offer high durability. You choose how you want to store your objects based on your application’s performance access requirements.
At present, you can use the following storage classes with S3:
- STANDARD: default for frequently accessed data
- STANDARD_IA: for infrequently used data that needs to be retrieved rapidly when requested
- ONEZONE_IA: for the same use case as STANDARD_IA, but stores the data in one Availability Zone instead of three
- REDUCED_REDUNDANCY: for frequently used noncritical data that is easily reproducible
If you want to change the storage class of an existing object, you need to recreate the object.
For example, reupload the third_object and set its storage class to Standard_IA:
third_object.upload_file(third_file_name, ExtraArgs={
                         'ServerSideEncryption': 'AES256',
                         'StorageClass': 'STANDARD_IA'})
Note: If you make changes to your object, you might find that your local instance doesn’t show them. What you need to do at that point is call .reload() to fetch the newest version of your object.
Reload the object, and you can see its new storage class:
>>> third_object.reload()
>>> third_object.storage_class
'STANDARD_IA'
Note: Use LifeCycle Configurations to transition objects through the different classes as you find the need for them. They will automatically transition these objects for you.
Versioning
You should use versioning to keep a complete record of your objects over time. It also acts as a protection mechanism against accidental deletion of your objects. When you request a versioned object, Boto3 will retrieve the latest version.
When you add a new version of an object, the storage that object takes in total is the sum of the size of its versions. So if you’re storing an object of 1 GB, and you create 10 versions, then you have to pay for 10GB of storage.
Enable versioning for the first bucket. To do this, you need to use the BucketVersioning class:
def enable_bucket_versioning(bucket_name):
    bkt_versioning = s3_resource.BucketVersioning(bucket_name)
    bkt_versioning.enable()
    print(bkt_versioning.status)
>>> enable_bucket_versioning(first_bucket_name)
Enabled
Then create two new versions for the first file Object, one with the contents of the original file and one with the contents of the third file:
s3_resource.Object(first_bucket_name, first_file_name).upload_file(
   first_file_name)
s3_resource.Object(first_bucket_name, first_file_name).upload_file(
   third_file_name)
Now re-upload the second file, which will create a new version:
s3_resource.Object(first_bucket_name, second_file_name).upload_file(
    second_file_name)
You can retrieve the latest available version of your objects like so:
>>> s3_resource.Object(first_bucket_name, first_file_name).version_id
'eQgH6IC1VGcn7eXZ_.ayqm6NdjjhOADv'
In this section, you’ve seen how to work with some of the most important S3 attributes and add them to your objects. Next, you’ll see how to easily traverse your buckets and objects.
Traversals
If you need to retrieve information from or apply an operation to all your S3 resources, Boto3 gives you several ways to iteratively traverse your buckets and your objects. You’ll start by traversing all your created buckets.
Bucket Traversal
To traverse all the buckets in your account, you can use the resource’s buckets attribute alongside .all(), which gives you the complete list of Bucket instances:
>>> for bucket in s3_resource.buckets.all():
...     print(bucket.name)
...
firstpythonbucket7250e773-c4b1-422a-b51f-c45a52af9304
secondpythonbucket2d5d99c5-ab96-4c30-b7f7-443a95f72644
You can use the client to retrieve the bucket information as well, but the code is more complex, as you need to extract it from the dictionary that the client returns:
>>> for bucket_dict in s3_resource.meta.client.list_buckets().get('Buckets'):
...     print(bucket_dict['Name'])
...
firstpythonbucket7250e773-c4b1-422a-b51f-c45a52af9304
secondpythonbucket2d5d99c5-ab96-4c30-b7f7-443a95f72644
You have seen how to iterate through the buckets you have in your account. In the upcoming section, you’ll pick one of your buckets and iteratively view the objects it contains.
Object Traversal
If you want to list all the objects from a bucket, the following code will generate an iterator for you:
>>> for obj in first_bucket.objects.all():
...     print(obj.key)
...
127367firstfile.txt
616abesecondfile.txt
fb937cthirdfile.txt
The obj variable is an ObjectSummary. This is a lightweight representation of an Object. The summary version doesn’t support all of the attributes that the Object has. If you need to access them, use the Object() sub-resource to create a new reference to the underlying stored key. Then you’ll be able to extract the missing attributes:
>>> for obj in first_bucket.objects.all():
...     subsrc = obj.Object()
...     print(obj.key, obj.storage_class, obj.last_modified,
...           subsrc.version_id, subsrc.metadata)
...
127367firstfile.txt STANDARD 2018-10-05 15:09:46+00:00 eQgH6IC1VGcn7eXZ_.ayqm6NdjjhOADv {}
616abesecondfile.txt STANDARD 2018-10-05 15:09:47+00:00 WIaExRLmoksJzLhN7jU5YzoJxYSu6Ey6 {}
fb937cthirdfile.txt STANDARD_IA 2018-10-05 15:09:05+00:00 null {}
You can now iteratively perform operations on your buckets and objects. You’re almost done. There’s one more thing you should know at this stage: how to delete all the resources you’ve created in this tutorial.
Deleting Buckets and Objects
To remove all the buckets and objects you have created, you must first make sure that your buckets have no objects within them.
Deleting a Non-empty Bucket
To be able to delete a bucket, you must first delete every single object within the bucket, or else the BucketNotEmpty exception will be raised. When you have a versioned bucket, you need to delete every object and all its versions.
If you find that a LifeCycle rule that will do this automatically for you isn’t suitable to your needs, here’s how you can programatically delete the objects:
def delete_all_objects(bucket_name):
    res = []
    bucket=s3_resource.Bucket(bucket_name)
    for obj_version in bucket.object_versions.all():
        res.append({'Key': obj_version.object_key,
                    'VersionId': obj_version.id})
    print(res)
    bucket.delete_objects(Delete={'Objects': res})
The above code works whether or not you have enabled versioning on your bucket. If you haven’t, the version of the objects will be null. You can batch up to 1000 deletions in one API call, using .delete_objects() on your Bucket instance, which is more cost-effective than individually deleting each object.
Run the new function against the first bucket to remove all the versioned objects:
>>> delete_all_objects(first_bucket_name)
[{'Key': '127367firstfile.txt', 'VersionId': 'eQgH6IC1VGcn7eXZ_.ayqm6NdjjhOADv'}, {'Key': '127367firstfile.txt', 'VersionId': 'UnQTaps14o3c1xdzh09Cyqg_hq4SjB53'}, {'Key': '127367firstfile.txt', 'VersionId': 'null'}, {'Key': '616abesecondfile.txt', 'VersionId': 'WIaExRLmoksJzLhN7jU5YzoJxYSu6Ey6'}, {'Key': '616abesecondfile.txt', 'VersionId': 'null'}, {'Key': 'fb937cthirdfile.txt', 'VersionId': 'null'}]
As a final test, you can upload a file to the second bucket. This bucket doesn’t have versioning enabled, and thus the version will be null. Apply the same function to remove the contents:
>>> s3_resource.Object(second_bucket_name, first_file_name).upload_file(
...     first_file_name)
>>> delete_all_objects(second_bucket_name)
[{'Key': '9c8b44firstfile.txt', 'VersionId': 'null'}]
You’ve successfully removed all the objects from both your buckets. You’re now ready to delete the buckets.
Deleting Buckets
To finish off, you’ll use .delete() on your Bucket instance to remove the first bucket:
s3_resource.Bucket(first_bucket_name).delete()
If you want, you can use the client version to remove the second bucket:
s3_resource.meta.client.delete_bucket(Bucket=second_bucket_name)
Both the operations were successful because you emptied each bucket before attempting to delete it.
You’ve now run some of the most important operations that you can perform with S3 and Boto3. Congratulations on making it this far! As a bonus, let’s explore some of the advantages of managing S3 resources with Infrastructure as Code.
Conclusion
Congratulations on making it to the end of this tutorial!
You’re now equipped to start working programmatically with S3. You now know how to create objects, upload them to S3, download their contents and change their attributes directly from your script, all while avoiding common pitfalls with Boto3.
May this tutorial be a stepping stone in your journey to building something great using AWS!