The default MySQL server listens only on the localhost interface. Which means no one can connect MySQL from the remote system. This is a good practice for security purposes in productions environments. But in the case of database and web servers are running separately, needs to allow MySQL remote connections.
MySQL allows us to define an IP address to listen to. You can provide the IP address of the LAN network, which allows access to MySQL from the local network only. To allow the public network, you can simply define all zero’s (0.0.0.0) as an IP address to allow MySQL remote connection for any host.
This tutorial will help you to configure MySQL server to allow connections from remote systems.
Step 1 – Configure MySQL Service
The default MySQL server listens on the localhost interface only. You need to change this to listen on all interfaces.
Edit MySQL database server configuration file in a text editor. The Debian based systems have MySQL configuration file at /etc/mysql/mysql.conf.d/mysqld.cnf. Let’s Edit MySQL configuration file:
sudo nano /etc/mysql/mysql.conf.d/mysqld.cnf Search for the bind-address setting in the file. The default bind-address is set to 127.0.0.1 as below:
# Instead of skip-networking the default is now to listen only on
# localhost which is more compatible and is not less secure.
bind-address = 127.0.0.1
Change the bind-address value to 0.0.0.0 enable the MySQL database server to listen on all network interfaces.
# Instead of skip-networking the default is now to listen only on
# localhost which is more compatible and is not less secure.
bind-address = 0.0.0.0
After the change, the value will look like the above.
In MySQL 8 database configuration file, you will not see the bind-address setting. So you just need to manually add the bind-address under [mysqld] tag.
[mysqld]
pid-file        = /var/run/mysqld/mysqld.pid
socket          = /var/run/mysqld/mysqld.sock
datadir         = /var/lib/mysql
log-error       = /var/log/mysql/error.log
bind-address    = 0.0.0.0
Save the configuration file and close it.
Restart MySQL service to apply changes.
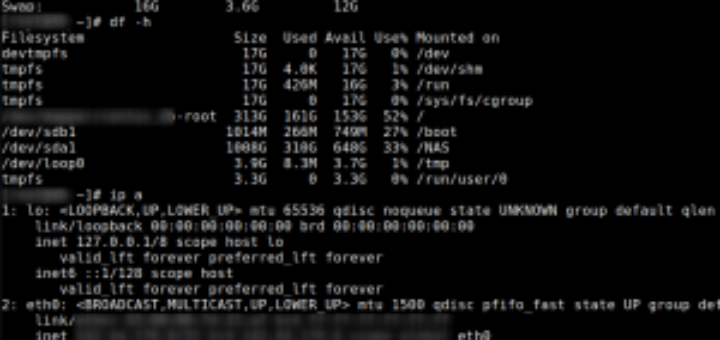
systemctl restart mysql.service Now, verify the changes and MySQL is listening on from all remote hosts. Execute the following command to view service status:
netstat -tulpn | grep -e "Local Address" -e "mysql" Output:
Proto Recv-Q Send-Q Local Address Foreign Address State PID/Program name
tcp 0 0 0.0.0.0:3306 0.0.0.0:* LISTEN 1698595/mysqld
tcp6 0 0 :::33060 :::* LISTEN 1698595/mysqld
You will see that MySQL is now listening on 0 0.0.0.0:3306 local address. It means the server is now listening on all network interfaces on port 3306.
Step 2 – Create MySQL User with Remote Access
Next, you need to create a MySQL user to connect from the remote host.
CRATE USER 'username'@'remote_server_ip_or_hostname' IDENTIFIED BY 'pa$$word';
- username – The name of user account used for login to MySQL server
- remote_server_ip_or_hostname – This is the ip address or hostname of remote host from where user is allowed to connect mysql server.
You can also use ‘%’ instead of remote host to allow any remote host. For example:
CREATE USER 'username'@'%' IDENTIFIED BY 'pa$$word';
Alternatively, you can create a new user account that will only connect from the remote host with the following command:
GRANT ALL on *.* TO 'username'@'remote_server_ip_or_hostname';
Reload the privileges to running MySQL server.
FLUSH PRIVILEGES;
At this point, you have configured your MySQL server to listen from remote hosts. Created a MySQL user account used for authentication from remote hosts.
Next, is to adjust security groups or system firewall to open MySQL port for remote systems.
Step 3 – Adjust Firewall
Before changing the system firewall, the system running in cloud hosting environments must-have update security group to open MySQL port based on hosting services.
Then, you need to open a port in the system firewall (if active). For example, most of the Linux systems opted FirewallD and some system like Debian-based systems uses UFW firewall.
Update the firewall based on your operating systems.
Using FirewallD
The FirewallD is the default firewall service in CentOS and RedHat-based systems. You can use the following command to open MySQL port 3306 for everyone, but it is not recommended for production servers.
sudo firewall-cmd --permanent --zone=public --add-port=3306/tcpsudo firewall-cmd --reload
The production server is recommended to open port for required hosts only. The FirewallD uses can use rich rules to open specific ports for specific IP address or network only. For example:
firewall-cmd --permanent --zone=public --add-rich-rule='
  rule family="ipv4"
  source address="192.168.0.0/24"
  port protocol="tcp" port="3306" accept'
After adding the required rule in FirewallD, make sure to reload to apply changes at runtime.
sudo firewall-cmd --reload Using UFW
The UFW (Uncomplicated Firewall) is the default firewall tool in Ubuntu and Debian systems. You can use the following command to open port 3306 from everyone.
sudo ufw allow 3306/tcp But the users of the production are recommended to open ports for specific IP or networks only. To allow access from specific IP addresses uses command like:
sudo ufw allow from 192.168.0.0/24 to any port 3306 Make sure to change 192.168.0.0/24 with your network or system’s IP address.
Step 4 – Connect Remote MySQL
You must have mysql client packages installed on your system to connect remote MySQL server.
mysql -h 192.168.0.100 -p 3306 -u DBUSER -pPASSWORD where:
- -h Hostname or IP address of the remote MySQL server (default: localhost)
- -p Port number of the MySQL server (default: 3306)
- -u MySQL username
- -p Password for the defined username, No space between -p and the password
This tutorial helped us to set up a MySQL server to accept remote connections from remote hosts. Also created a MySQL user account allowed to connect from remote hosts.