This article helps you to create and add a new virtual disk to an existing Linux virtual machine on VMware. Here are some steps for adding a new SCSI based virtual disk on a CentOS Linux virtual machine.
Solution
To add a new virtual disk for an existing Linux virtual machine, Log in as root on your Linux virtual machine. Run this below command and make note of the sdx entries, means list of existing hard disks.
# ls /dev/sd*
/dev/sda /dev/sda1 /dev/sda2
Log into the vCenter Server using the vSphere Client.
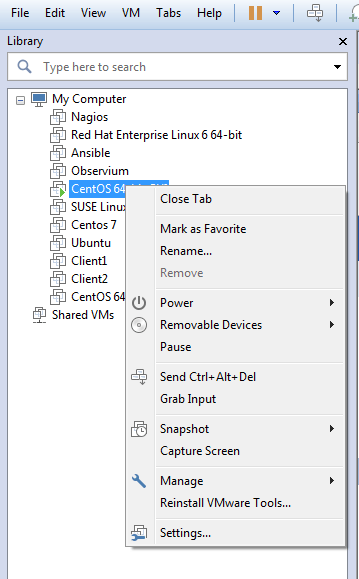
In the vSphere Client inventory, right-click the virtual machine and select Edit Settings.

Click the Hardware tab and click Add.
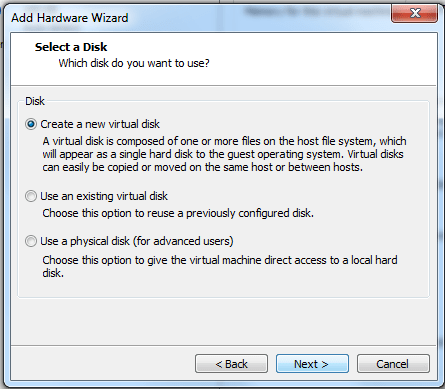
Select Hard Disk and click Next.
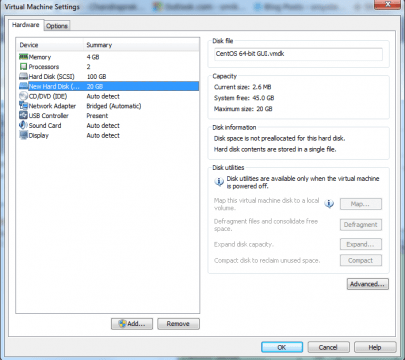
Complete the wizard. After adding the Hard disk to VMware/vSphere/vCenter it looks like this.
Reboot the Linux virtual machine.
# init 6
Log into the Virtual machine using the root credentials and run this command.
# ls /dev/sd*
/dev/sda /dev/sda1 /dev/sda2 /dev/sdb
We will find new entry.
Create an ext3 file system on the new disk using the new ‘sdb’ disk from the above list of disks
# mkfs -t ext3 /dev/sdb
mke2fs 1.41.12 (17-May-2010)
/dev/sdb is entire device, not just one partition!
Proceed anyway? (y,n) y
Filesystem label=
OS type: Linux
Block size=4096 (log=2)
Fragment size=4096 (log=2)
Stride=0 blocks, Stripe width=0 blocks
1310720 inodes, 5242880 blocks
262144 blocks (5.00%) reserved for the super user
First data block=0
Maximum filesystem blocks=4294967296
160 block groups
32768 blocks per group, 32768 fragments per group
8192 inodes per group
Superblock backups stored on blocks:
32768, 98304, 163840, 229376, 294912, 819200, 884736, 1605632, 2654208,
4096000
Writing inode tables: done
Creating journal (32768 blocks): done
Writing superblocks and filesystem accounting information: done

This filesystem will be automatically checked every 38 mounts or
180 days, whichever comes first. Use tune2fs -c or -i to override.
You may see an alert that, you are performing this operation on an entire device, not a partition. That is correct, as you created a single virtual disk of the intended size. This is assuming you have specified the correct device.
Caution: Ensure that you have the selected the right device, there is no undo.
Run the fdisk command to verify the existence of the disk you created.
# fdisk -l
Disk /dev/sda: 21.5 GB, 21474836480 bytes
255 heads, 63 sectors/track, 2610 cylinders
Units = cylinders of 16065 * 512 = 8225280 bytes
Sector size (logical/physical): 512 bytes / 512 bytes
I/O size (minimum/optimal): 512 bytes / 512 bytes
Disk identifier: 0x000c664e

Device Boot Start End Blocks Id System
/dev/sda1 * 1 64 512000 83 Linux
Partition 1 does not end on cylinder boundary.
/dev/sda2 64 2611 20458496 8e Linux LVM

Disk /dev/sdb: 21.5 GB, 21474836480 bytes
255 heads, 63 sectors/track, 2610 cylinders
Units = cylinders of 16065 * 512 = 8225280 bytes
Sector size (logical/physical): 512 bytes / 512 bytes
I/O size (minimum/optimal): 512 bytes / 512 bytes
Disk identifier: 0x00000000


Disk /dev/mapper/VolGroup-lv_root: 18.8 GB, 18798870528 bytes
255 heads, 63 sectors/track, 2285 cylinders
Units = cylinders of 16065 * 512 = 8225280 bytes
Sector size (logical/physical): 512 bytes / 512 bytes
I/O size (minimum/optimal): 512 bytes / 512 bytes
Disk identifier: 0x00000000


Disk /dev/mapper/VolGroup-lv_swap: 2147 MB, 2147483648 bytes
255 heads, 63 sectors/track, 261 cylinders
Units = cylinders of 16065 * 512 = 8225280 bytes
Sector size (logical/physical): 512 bytes / 512 bytes
I/O size (minimum/optimal): 512 bytes / 512 bytes
Disk identifier: 0x00000000
Run this command to create a mount point for the new disk and mount that disk
# mkdir /newdisk
# mount /dev/sdb /newdisk
To verify the mount run below command –
# df -h
Filesystem Size Used Avail Use% Mounted on
/dev/mapper/VolGroup-lv_root
18G 2.0G 15G 12% /
tmpfs 491M 0 491M 0% /dev/shm
/dev/sda1 477M 42M 411M 10% /boot
/dev/sdb 20G 173M 19G 1% /newdisk
Now the new disk is available to you for usage. To mount the new disk or volume automatically at the boot time follow the below procedure –
Run this command to display the current /etc/fstab
# cat /etc/fstab#
# /etc/fstab
# Created by anaconda on Thu Dec 3 20:25:38 2015
#
# Accessible filesystems, by reference, are maintained under '/dev/disk'
# See man pages fstab(5), findfs(8), mount(8) and/or blkid(8) for more info
#
/dev/mapper/VolGroup-lv_root / ext4 defaults 1 1
UUID=e1e6c609-a94f-400f-9dc5-93faf0aab358 /boot ext4 defaults 1 2
/dev/mapper/VolGroup-lv_swap swap swap defaults 0 0
tmpfs /dev/shm tmpfs defaults 0 0
devpts /dev/pts devpts gid=5,mode=620 0 0
sysfs /sys sysfs defaults 0 0
proc /proc proc defaults 0 0
Using a text editor to edit fstab and add this line to add the disk to /etc/fstab so that it is available across reboots
/dev/sdb /newdisk ext3 defaults 1 3
After this configuration you are able to add new Virtual hard disk drives to existing Linux machines on VMware/vSphere/vCenter. This will help in the provision of a hard disk for backups or stored data to the existing Centos Linux machines.