This tutorial serves as a good introduction for beginners on the apt-get command. It can also help more experienced users refresh their memory and improve their knowledge of terminal commands.
What is apt-get?
Advanced Package Tool (APT) is a package management system for Debian, Ubuntu, and other Linux distributions. It is quite powerful, allowing you to search for, install, manage, update, and remove the software. This secure tool is easy to use since it does not build software from the source code. Instead, it compiles the source code or uses precompiled files to install software packages.
Different command-line programs interact with the APT library. The most popular by far is apt-get, along with apt-cache, apt-config, and apt.
Note: All these commands, except the apt-cache (search) command, only work within root or superuser (sudo) privileges.
What’s the Difference Between apt-get and apt?
First, let’s start by distinguishing between apt-get and apt-cache. The difference is merely functional, and you would use one or the other depending on what you want to do. You use apt-get for installing, upgrading, and removing software packages. On the other hand, use apt-cache in instances when you need to search for new packages.
However, many users are still confused when it comes to the difference between apt-get and apt. Linux introduced apt in 2014 as a friendlier command-line tool for front-end users. Apt combines the most commonly used apt-get and apt-cache commands. The goal was to solve the problem of having too many functionalities that the average user had no need for.
The apt command-line program introduced a couple of other innovations:
- The progress bar, so you can follow the installation and removal of software packages
- The number of packages that can be upgraded after updating the package repository
Using apt-get Commands
How to Update the Package Repository with apt-get
Before you install a package, it is crucial to resynchronize the package index files and update the package repository to the latest version. This ensures that the packages you install are up-to-date.
Update the package repository by running the command:
sudo apt-get updateWhat is the Difference Between Update and Upgrade?
There is a big difference between updating and upgrading. When you update your package repository, it only makes the newer versions of packages available in the repository.
However, it does not update the packages you already have installed. In order to do that, you have to upgrade your packages.
How to Upgrade Packages
To upgrade all installed packages, use the apt-get command:
sudo apt-get upgradeTo upgrade a specific package:
sudo apt-get upgrade <package_name>What is the Difference Between Upgrade and Dist-upgrade?
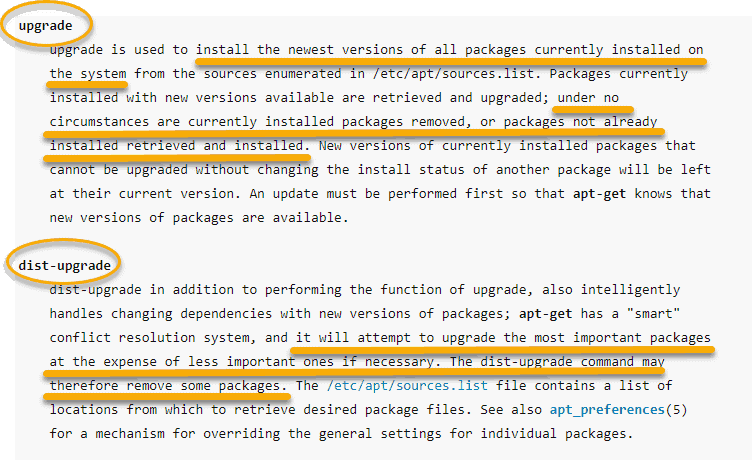
The difference is that dist-upgrade searches for dependencies with newer versions, installs new packages, and removes old ones on its own.
On the other hand, upgrade never installs or removes packages on its own. It only installs the latest versions of the installed packages on your system.
You should be careful when using dist-upgrade as it may remove some packages you still want and need on your system. The apt-get manual explains the function and underlying difference of both commands as follows:
How to Install a Package with apt-get
To install a package using apt-get, type in the following command:
sudo apt-get install <package_name>Note: Replace <package_name> with the name of the software package you intend to install. If you do not know the exact name of the package, type in the first few letters and press TAB. The system will suggest all the packages available, starting with those letters.
How to Install a Specific Application Version
If you do not want the latest version of a software, you can install an older one by specifying the exact version number.
sudo apt-get install *package number*=version numberBefore the system installs the package, you will receive an output showing:
- The additional packages required for the installation to be successful.
- The package you intend to install.
- The packages that must be upgraded.
- How much disk space the package will use.
For example, if you want to install curl, you will receive the output as in the image below:
Finally, it will ask you whether you wish to continue with the installation. To answer, you must type in y for yes or n for no.
How to Install Multiple Packages
If you need to install more than one package, you can speed up the installation process by installing multiple packages at the same time with a single command:
sudo apt-get install <package_name1> <package_name2> <package_name3>Note: If you have packages with many reverse dependencies and you need the most up-to-date versions, use the apt-get reinstall command.
How to Remove Installed Packages with apt-get
You can remove a package with the remove command:
sudo apt-get remove <package_name> However, this command only removes the package, leaving its configuration files on the system. If you want to remove the package along with its configuration files, use the command:
sudo apt-get purge <package_name> How to Clean Up Disk Space
Wonder how much disk space in GB you have?
When you install a package, you have to download a file with a .deb extension. You can find this file in the /var/cache/apt/packages folder. After installing, you can delete the .deb files from your local repository, so they do not take up disk space.
To clean the local repository of retrieved package files, use the command:
sudo apt-get cleanThe clean command will remove everything except the local file from /var/cache/apt/archives/ and /var/cache/apt/archives/partial/.
Another way to empty the local repository of retrieved files is to use autoclean to clear out packages that are no longer available, use the command:
sudo apt-get autocleanTo remove the unnecessary packages that apt-get automatically installs to satisfy dependencies for other packages, run the command:
sudo apt-get autoremoveUsing apt-cache
How to List All Available Packages
You can browse through all the available packages in the repository with the command:
apt-cache pkgnamesHow to Search for Package Using apt-cache
If you want to read a description of a package before you install it, you can do so by running the command:
apt-cache search <package_name>Note: Don’t worry if you do not know the exact name of a package. You will see the results on the searched term by going through the names and the descriptions of all available packages.
How to Find Information About a Package
If you know the exact name of the package you wish to install, but want to see all the information regarding that package, use the following command:
apt-cache showpkg <package_name>How to View Dependencies for Specific Packages
You can search through a list of dependencies a package has, along with all other possible packages that can fulfill that dependency with the command:
apt-cache depends pkg <package_name>How to List All Installed Packages
In case you want to inspect which packages you already have on your system, you can do so with:
apt-cache pkgnames <package_name>


