In this article, we will learn How to Backup and Restore MySQL Databases Using the “mysqldump” Command?
As we know, data is a valuable asset to the organization. As database administrators, it is our primary and crucial job to keep the data available and safe. If the system or data center fails, database corruption, and data loss, we must be able to recover it within the defined SLA.
Here, we are not going to discuss any third-party vendor’s backup solutions. I am going to explain the native methods that is used to generate the backup of the database. We can generate the backup of the MySQL database using any of the following methods:
- Generate the backup using mysqldump utility
- Generate Incremental backups using Binary Log
- Generate backups using the Replication of Slaves
In this article, I am going to explain how we can use mysqldump to generate the backup of the MySQL database.
Generate Backup Using “mysqldump” Utility
“mysqldump” is a command-line utility that is used to generate the logical backup of the MySQL database. It produces the SQL Statements that can be used to recreate the database objects and data. The command can also be used to generate the output in the XML, delimited text, or CSV format.
This command is easy to use, but the only problem that occurs while restoring the database. As I mentioned, when we generate a backup of the MySQL database, it creates a backup file that contains SQL commands that are necessary to rebuild or restore the database. Now, when we restore the database, the command executes all the SQL Statements to create tables and insert the data. If you have a large database, then the restoration process takes a long time to complete.
Note: By default, mysqldump command does not dump the information_schema database, performance_schema, and MySQL Cluster ndbinfo database.
If you want to include the information_schema tables, you must explicitly specify the name of the database in the mysqldump command, also include the —skip-lock-tables option.
There are lots of options and features that can be used with mysqldump. You can view the complete list of options here. I am going to some of the basic features. Following is the syntax of the mysqldump utility.
mysqldump -u [user name] –p [password] [options] [database_name] [tablename] > [dumpfilename.sql]The parameters are as following:
- -u [user_name]: It is a username to connect to the MySQL server. To generate the backup using mysqldump, ‘Select‘ to dump the tables, ‘Show View‘ for views, ‘Trigger‘ for the triggers. If you are not using —single-transaction option, then ‘Lock Tables‘ privileges must be granted to the user
- -p [password]: The valid password of the MySQL user
- [option]: The configuration option to customize the backup
- [database name]: Name of the database that you want to take backup
- [table name]: This is an optional parameter. If you want to take the backup specific tables, then you can specify the names in the command
- “<” OR ”>”: This character indicates whether we are generating the backup of the database or restoring the database. You can use “>” to generate the backup and “<” to restore the backup
- [dumpfilename.sql]: Path and name of the backup file. As I mentioned, we can generate the backup in XML, delimited text, or SQL file so we can provide the extension of the file accordingly
- -h [hostname] Pass hostname if you are using a database that is not residing on localhost. Example -h cdls-dev-db.mytechmint.us-east-1.rds.amazonaws.com
- –no-data: Passing this argument will not include database data in the dump, it will only take the dump of schema.
Generate the Backup of a Single Database
For example, you want to generate the backup of the single database, run the following command. The command will generate the backup of the “sakila” database with structure and data in the sakila_20220228.sql file.
Here for all examples we will use a sample database provided by MySQL, that can be downloaded from here. For more details of sample database “sakila” please visit MySQL documentation.
mysqldump -u root -p sakila > C:\MySQLBackup\sakila_20220228.sqlWhen you run this command, it prompts for the password. Here we are NOT passing the password, “sakila” is passed as an option that is our database name. If you wanted to pass the password along with the command then use the below command where -pPassWord is how we can pass the password to mysqldump command. Passing passwords along with commands as plaintext are not preferable so we will not pass it, below command is just for explanation.
mysqldump -u root -pPassWord sakila > C:\MySQLBackup\sakila_20220228.sqlOnce backup is generated successfully, let us open the backup file to view the content of the backup file. Open the backup location and double-click on the “sakila_20220228.sql” file.
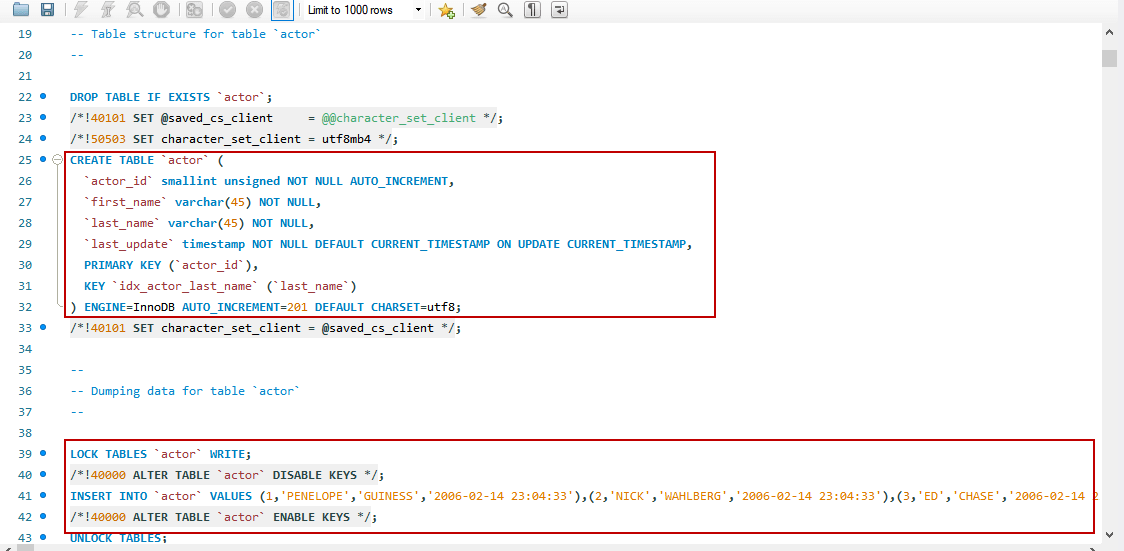
As you can see in the above image, the backup file contains the various T-SQL statements that can be used to re-create the objects.
Generate the Backup of Multiple Databases or All the Databases
For example, you want to generate a backup of more than one database. You must add the —databases option in the mysqldump command. The following command will generate the backup of “sakila” and “employees” database with structure and data.
mysqldump -u root -p –databases sakila employees > C:\MySQLBackup\sakila_employees_20220228.sqlSimilarly, if you want to generate the backup of all the databases, you must use –all-databases option in the mysqldump command. The following command will generate the backup of all databases within MySQL Server.
mysqldump -u root -p –all-databases > C:\MySQLBackup\all_databases_20220228.sqlGenerate the Backup of Database Structure
If you want to generate the backup of the database structure, then you must use the –no-data option in the mysqldump command. The following command generates the backup of the database structure of the sakila database.
mysqldump -u root -p –no-data sakila > C:\MySQLBackup\sakila_objects_definition_20220228.sqlGenerate the Backup of a Specific Table
If you want to generate the backup of a specific table, then you must specify the name of the tables after the name of the database. The following command generates the backup of the actor table of the sakila database.
mysqldump -u root -p sakila actor payment > C:\MySQLBackup\actor_payment_table_20220228.sqlIf you want to generate the backup of more than one tables, than you must separate the names of the tables with space, the following command generates the backup of actor and payment table of sakila database.
Generate the Backup of Database Data
If you want to generate the backup of the data without the database structure, then you must use the –no-create-info option in the mysqldump command. The following command generates the backup of data of the sakila database.
mysqldump -u root -p sakila –no-create-info > C:\MySQLBackup\sakila_data_only_20220228.sqlRestore the MySQL Database
Restoring a MySQL database using mysqldump is simple. To restore the database, you must create an empty database. First, let us drop and recreate the sakila database by executing the following command.
drop database sakila;
create database sakila;
When you restore the database, instead of using mysqldump, you must use mysql; otherwise, the mysqldump will not generate the schema and the data. Execute the following command to restore the sakila database:
mysql -u root -p sakila < C:\MySQLBackup\sakila_20220228.sqlOnce command executes successfully, execute the following command to verify that all objects have been created on the sakila database.
use sakila;
show tables;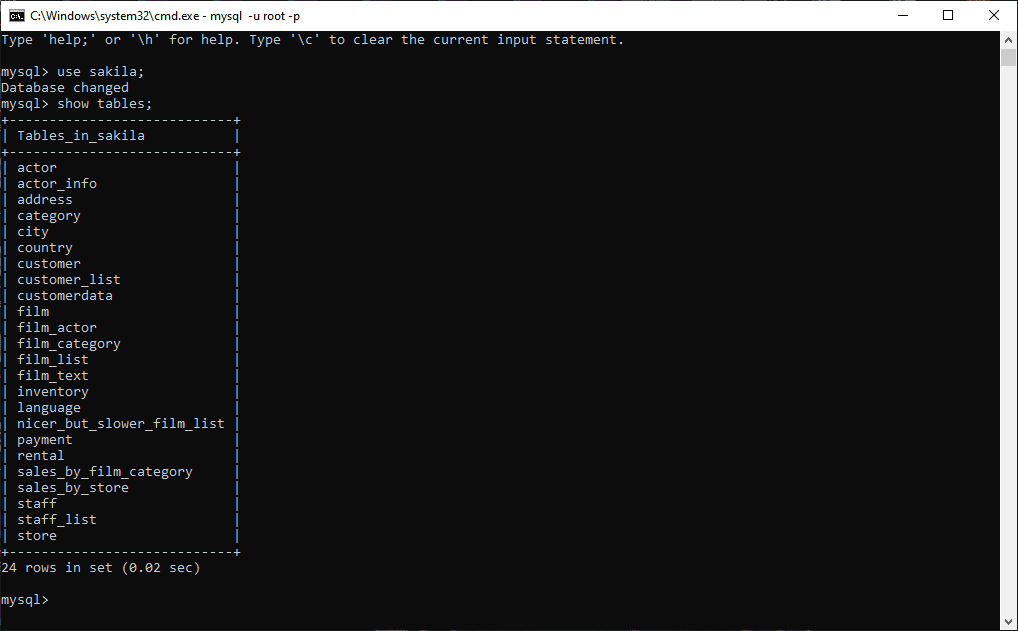
Restore a Specific Table in the Database
For instance, someone dropped a table from the database. Instead of restoring the entire database, we can restore the dropped table from the available backup. To demonstrate, drop the actor table from the sakila database by executing the following command on the MySQL command-line tool.
use sakila;
drop table actor;
To restore the actor table, perform the following step-by-step process.
Step 1 :
Create a dummy database named sakila_dummy and restore the backup of the sakila database on it. Following is the command.
create database sakila_dummy;
use sakila_dummy;
source C:\MySQLBackup\sakila_20220228.sql
Step 2:
Backup the actor table to sakila_dummy_actor_20220228.sql file. Following is the command
mysqldump -u root -p sakila_dummy actor > C:\MySQLBackup\sakila_dummy_actor_20220228.sqlStep 3:
Restore the actor table from the “sakila_dummy_actor_20220228.sql” file. Following is the command on the MySQL command-line tool.
mysql> source C:\MySQLBackup\sakila_dummy_actor_20220228.sqlExecute the following command to verify the table has been restored successfully.
use sakila;
show tables;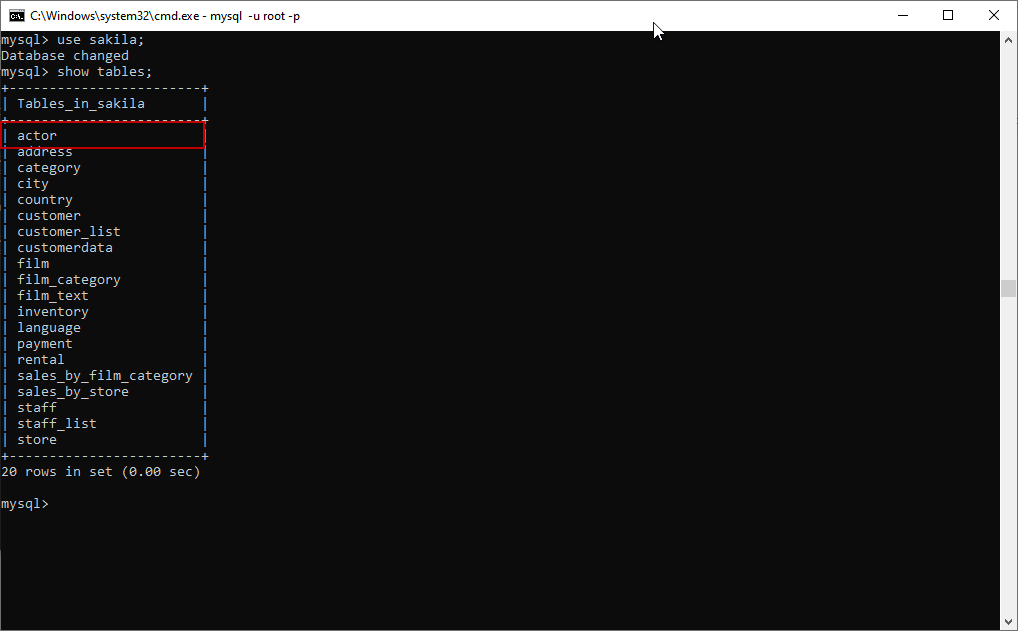
For default manual of “mysqldump” command use below command to explore more. 😎
man mysqldump